Petkit Yumshare Solo (Gen 1)
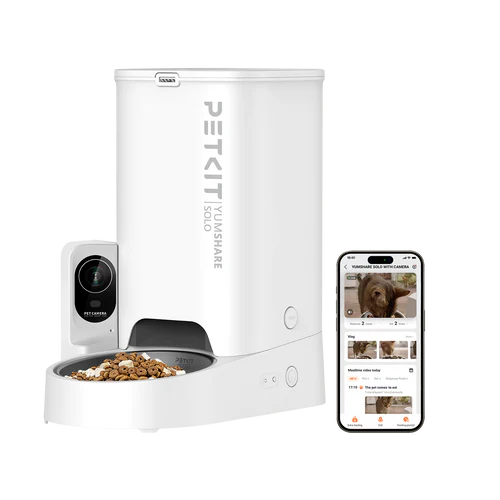
The Petkit Yumshare Solo is an automatic pet feeder with a built-in camera. In addition to scheduled feeding, it provides live video streaming, motion detection, pet detection, and eating detection. Localkit exposes all these features as Home Assistant entities via MQTT.
Installation
Localkit is installed through the Provisioning entry in the Web UI navigation. Once provisioning has succeeded, you are asked for a script — run the install script from the serial shell (see Physical Access), because telnet is not available until it completes:
wget -qO- http://tool.localkit.io/scripts/d4h/2.0.0/install | shTo remove Localkit again:
wget -qO- http://tool.localkit.io/scripts/d4h/1.0.0/uninstall | shOnce the script has finished, the feeder restarts and telnet is enabled. You can then log in with the credentials listed under How to connect.
Supported Features
- ✅ Manual feed trigger
- ✅ Feeding schedules
- ✅ Camera control (enable/disable)
- ✅ Live stream (RTSP)
- ✅ Snapshot capture
- ✅ Motion detection
- ✅ Pet visit detection
- ✅ Eating detection
- ✅ Night vision
- ✅ Microphone
- ✅ Food level warning
- ✅ Desiccant tracking
- ✅ Volume control
- ✅ Sensitivity tuning
- ✅ Bluetooth Proxy
Actions (Buttons)
These appear as Button entities in Home Assistant.
| Name | Description |
|---|---|
| Feed | Dispenses one portion of food immediately |
| Take Snapshot | Captures a photo from the built-in camera |
Sensors (Read-only)
These appear as Sensor entities in Home Assistant under the diagnostic category.
| Name | Technical Name | Unit | Description |
|---|---|---|---|
| Device Status | device_status | — | Current working state: IDLE, WORKING |
| Error | error | — | Active error: food_empty, door_closed, or null |
| IP Address | ip_address | — | The device's local IP address |
| Bowl | bowl | — | Current bowl status as a numeric code |
| Hertz | hertz | — | Camera frequency setting (50 or 60 Hz) |
| Next Desiccant Change in Days | durability_in_days | d | Days remaining until the desiccant packet should be replaced |
Binary Sensors (Read-only)
These appear as Binary Sensor entities in Home Assistant under the diagnostic category.
| Name | Technical Name | Device Class | Description |
|---|---|---|---|
| Move Detected | move_detected | motion | true when movement is detected in front of the feeder |
| Pet Detected | pet_detected | motion | true when the camera identifies a pet |
| Eat Detected | eat_detected | — | true when the camera detects eating behavior |
| Door | door | — | true when the food tray door is open |
| Infrared | infrared | — | true when the infrared night vision is active |
Snapshot
The most recent snapshot taken appears as an Image entity in Home Assistant.
| Name | Technical Name | Description |
|---|---|---|
| Snapshot | last_snapshot | The latest image captured from the camera |
Camera Stream
The camera feed can also be pulled directly as an RTSP stream:
rtsp://<device-ip>:8554/stream0Replace <device-ip> with the device's local IP address. The stream can be used in any RTSP-capable client — for example go2rtc or VLC — or added to a Home Assistant dashboard as described in Camera Streams.
Switches
These appear as Switch entities in Home Assistant under the config category.
| Name | Technical Name | Default | Description |
|---|---|---|---|
| Refill Alarm | food_warn | On | Sends a notification when the food hopper is running low |
| Child Lock | manual_lock | Off | Locks the physical buttons on the device |
| Camera | camera | On | Enables or disables the camera module |
| Microphone | microphone | On | Enables or disables the built-in microphone |
| Night Vision | night | Off | Switches the camera to infrared night vision mode |
| Timestamp Display | time_display | Off | Overlays the current time on the camera image |
| Move Detection | move_detection | On | Enables motion-triggered detection and alerts |
| Pet Visit Detection | pet_detection | On | Enables AI-based pet recognition |
| Pet Eat Detection | eat_detection | On | Enables detection of eating behavior |
| Voice for Food Dispensing | sound_enable | On | Plays a voice prompt when food is dispensed |
| Voice Prompt | system_sound_enable | On | Enables system voice guidance and status announcements |
| Pet Tracking | smart_frame | Off | Automatically frames and follows the pet in the camera view |
Select Controls
These appear as Select entities in Home Assistant under the config category.
| Name | Technical Name | Options | Description |
|---|---|---|---|
| Feed Amount | amount | 10, 15, 20, 25, 30, 35, 40, 45, 50 | Portion size per dispense in grams |
Number Controls
These appear as Number entities in Home Assistant under the config category.
| Name | Technical Name | Range | Step | Default | Description |
|---|---|---|---|---|---|
| Volume | volume | 0–9 | 1 | 4 | Speaker volume for voice prompts and dispense sounds |
| Move Sensitivity | move_sensitivity | 1–9 | 1 | 1 | Sensitivity of the motion detection (1 = least sensitive, 9 = most sensitive) |
| Pet Visit Sensitivity | pet_sensitivity | 1–9 | 1 | 3 | Sensitivity of the pet recognition AI |
| Pet Eat Sensitivity | eat_sensitivity | 1–9 | 1 | 3 | Sensitivity of the eating detection AI |
| Desiccant Durability | desiccant_durability | 0–90 | 1 | 30 | Expected lifespan of the desiccant packet in days. Used to calculate the next change reminder. |
Feeding Schedules
The feeder supports time-based feeding schedules. Each schedule entry defines a time of day and a portion amount. Schedules are stored in dedicated schedule tables and processed by Localkit to trigger feed actions at the configured times.
Physical Access
Soldering required
Unlike the Gen 2 models, the Yumshare Solo offers no telnet access out of the box. The device must be opened and a serial connection soldered to gain a shell.
To access the device:
- Open the device casing to expose the PCB.
- Connect an FTDI adapter to the serial pins.
- Use a terminal to establish a serial connection and gain shell access.
Soldering
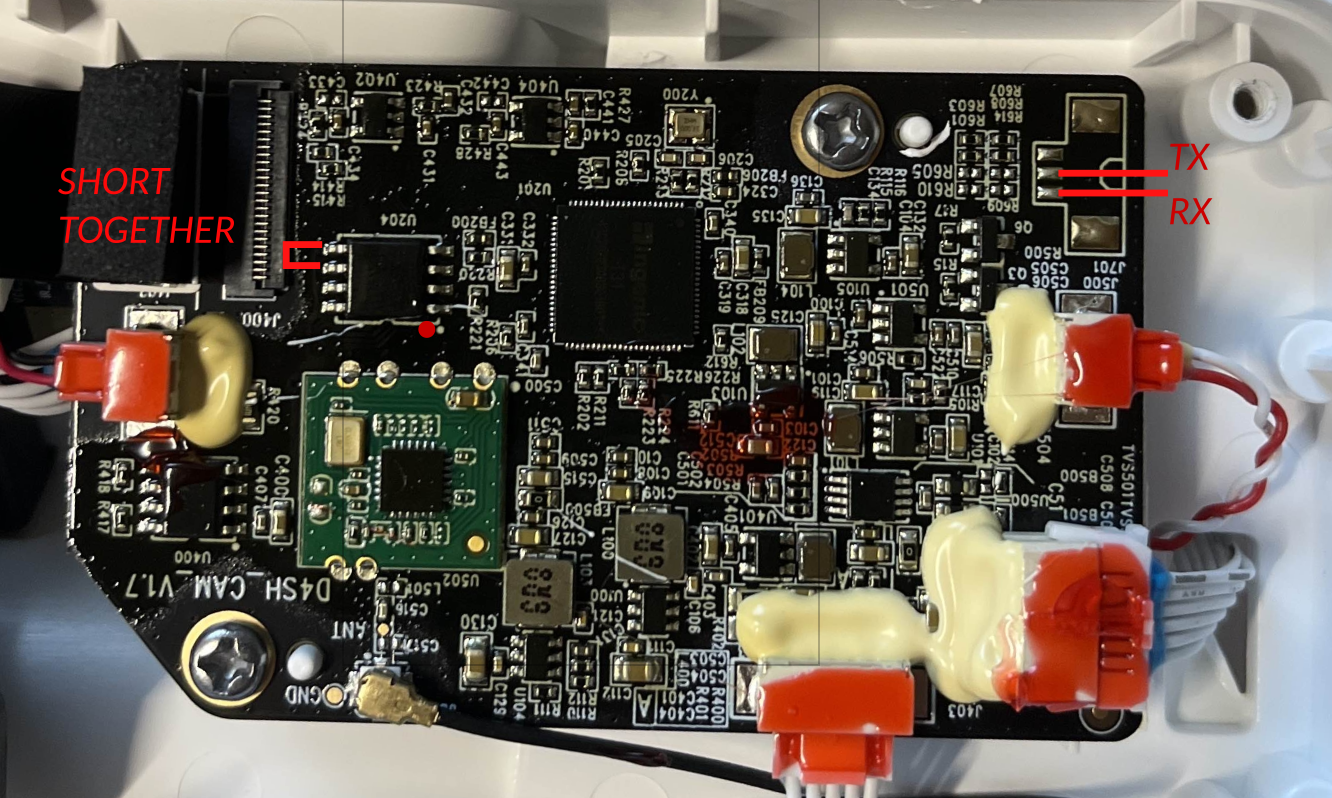
The main PCB is located behind the camera. The back piece of the camera needs to be unscrewed to access the board. The connector is not soldered, and the PCB is coated. You need to scratch the coating off, or remove it with acetone.
Once the cable is soldered, power on the feeder and wait until you are prompted for a password.
How to connect
Once telnet is enabled, connect to the device over telnet:
- Connect to the device via telnet:
telnet <device-ip> - Log in with user
rootand passwordwhile(&P.